Gold leaf wreath DIY - with free downloadable template and cut file
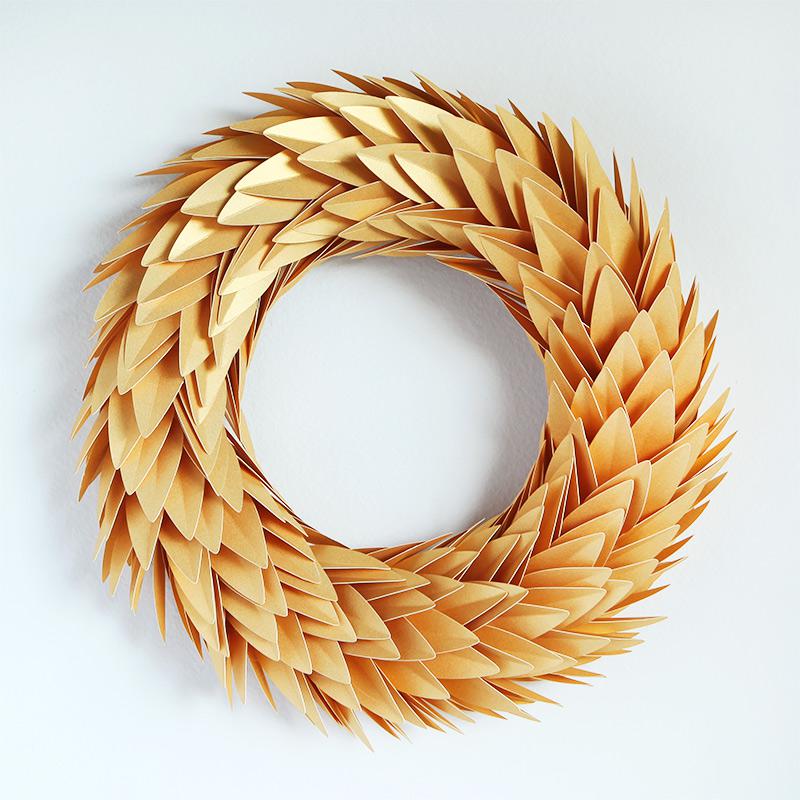
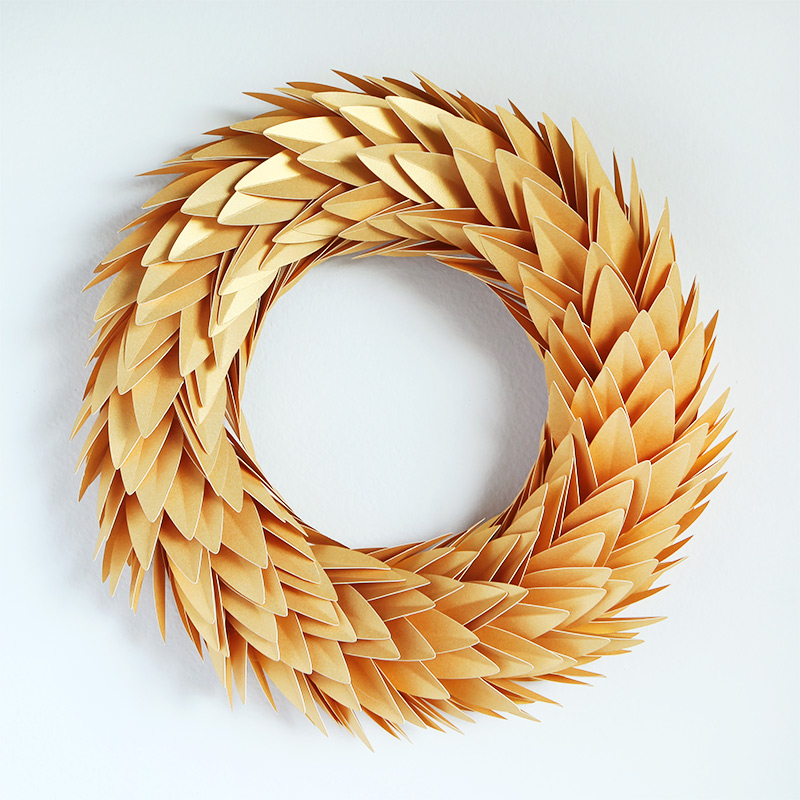
Today's project only uses 311 leaves. A snap to make. If it takes you a couple hours to snap. Slow snap.
I am including my svg file and a pdf template for this project in case you want to tackle it yourself. How's your slow snapping?
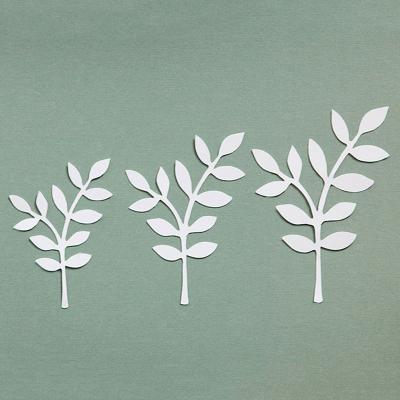
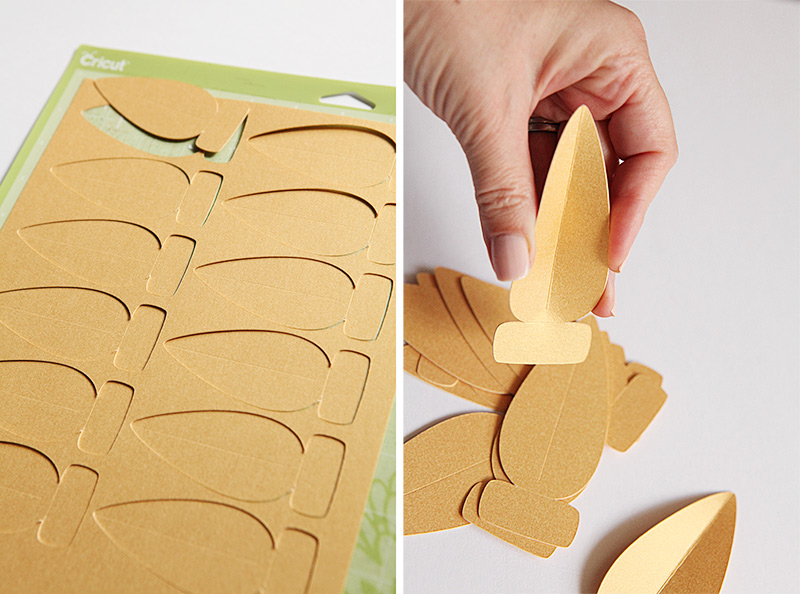
My svg file includes score lines to give the leaves a really crisp center fold. I love the added dimension this gives the wreath. So pretty.
Here is how I made it.
I got a stack of double sided gold card stock. It has quite a lovely shimmer and the tone of the gold is right up my ally. Not too brassy. A lovely light yellow tone. I got a 50 pack. For this project I used 26 sheets. It's gonna set you back 10 bucks just in cardstock, but I think it is totally worth it. This wreath feels very sturdy and I can see myself using it for many future Christmases.
The leaf file, which you can download for free below, is sized at 3.75 inches long. At this size, Cricut can fit 12 leaves onto one sheet of 8.5 x 11, and that is what I did.
The svg file contains score lines and therefore you have to change the score line layers to show the score line symbol and you also have to attach the layers together. Here is a tutorial on how to do that.
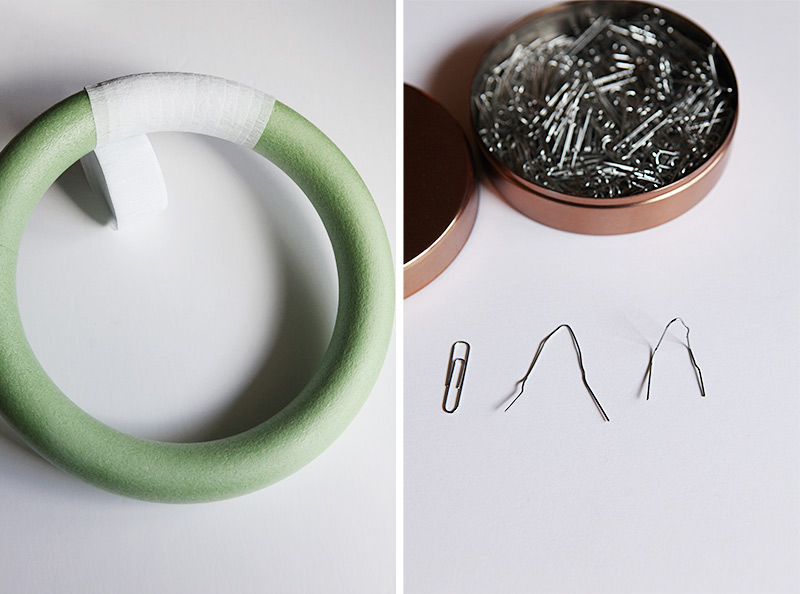
I used this 12 inch green foam wreath and some white crepe paper from a roll. I sprayed the foam wreath with spray adhesive, then rolled the crepe paper around twice. Depending on how close together you put your leaves, you could probably skip this step.
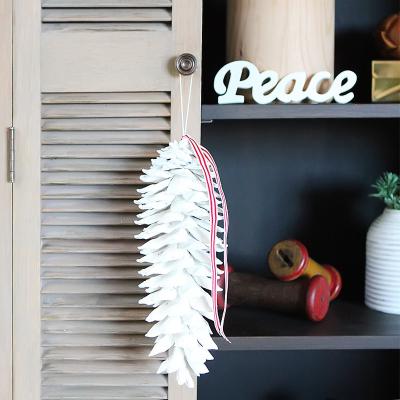
Oh and if you think this wreath looks familiar... It is of course inspired by this wreath, which took my breath away when it was on a recent catalog cover. Their wreaths are 5-10 pounds (weight - not British money), but also bigger and made with real brass. Mine is the paper version with the weight to match. Paper light. Or at least cardstock light.
I used a paper clip which I fashioned into a bent V shape and used as a hanger for the back of the wreath.
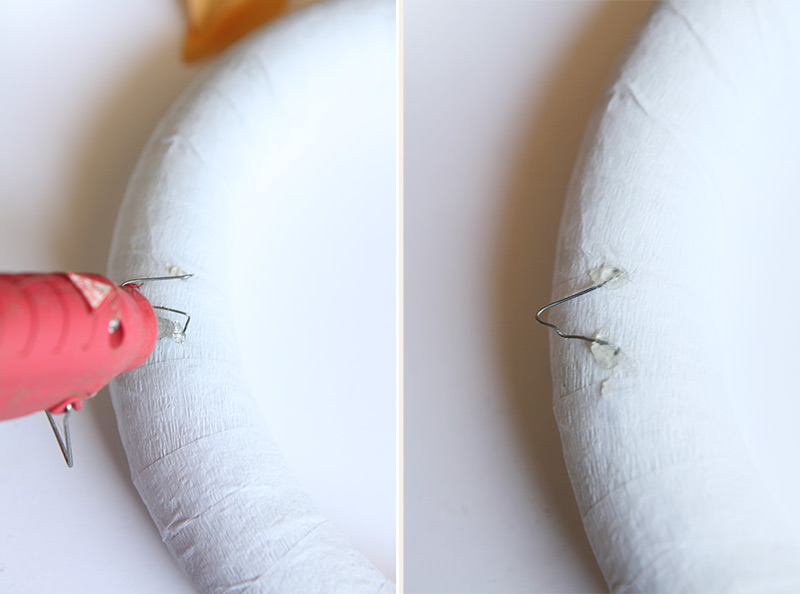
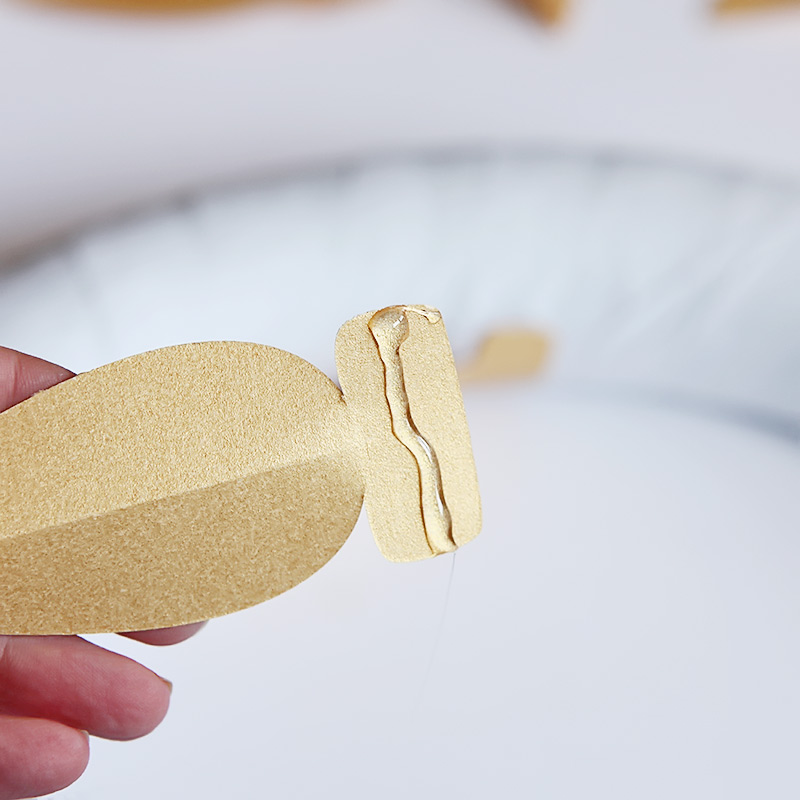
For this project I used low temperature hot glue. I added some hot glue to the paper clip V and pushed it into the wreath on the back. I then added two beads of hot glue on top of where the bent V went into the wreath. Let it cool a bit, then pressed down on the beads of glue to secure.
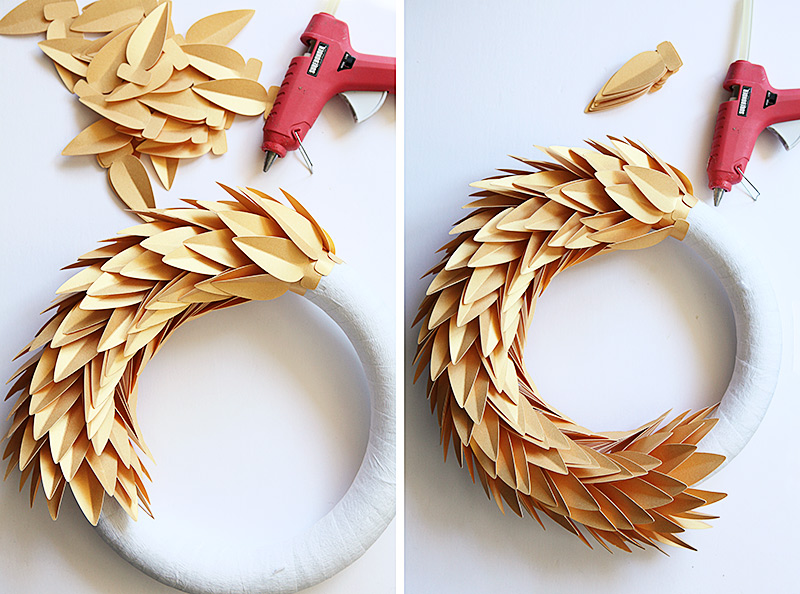
I then began the task of hot gluing the leaves to the wreath. This is how much glue I added to each leaf - see below. I used one and a half large sticks of hot glue for this project.
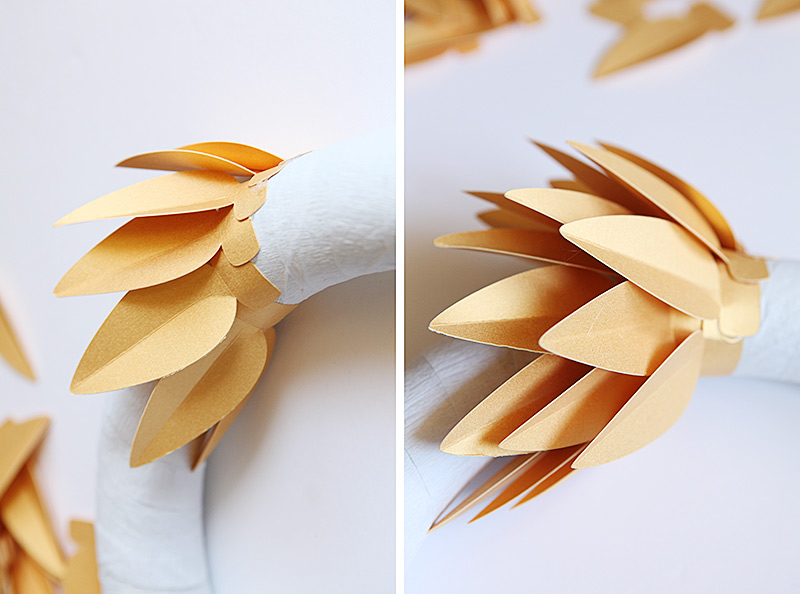
I put the first row in a fan like formation as shown below left. I used 7 leaves for this first row. I added the next rows in a similar fashion, but as I went along I sometimes needed to fill in extra leaves on the outer part of the wreath to keep the look even. For some rows I used 6 leaves. I didn't keep hundred percent to a specific pattern as I didn't want it too orderly looking. Just somewhat.
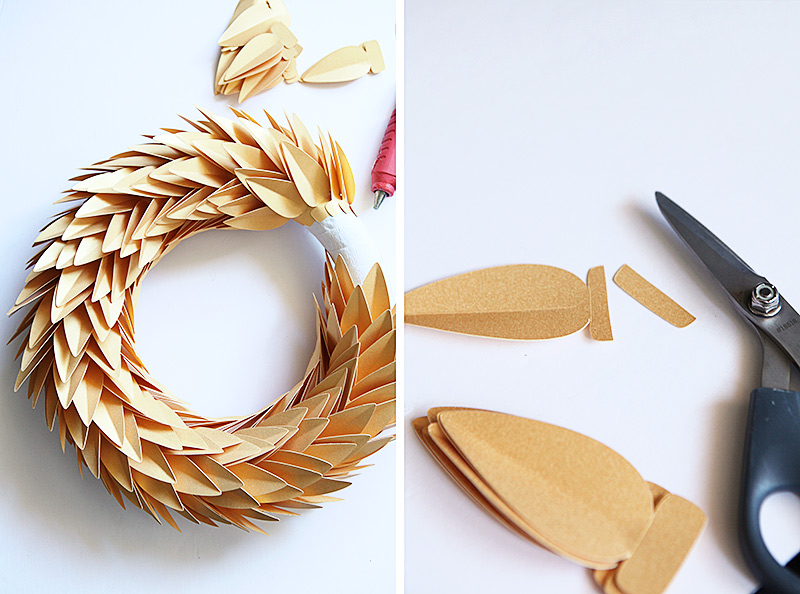
It took me a good two hours to glue all the leaves on. I had Cricut in full work mode cutting leaves while I was gluing. I fit 12 leaves to each sheet of paper and ended up using 26 sheets of cardstock as previously mentioned. So many leaves.
This cardstock is pretty thick so I had to set my cutter to one dot past 'fabric'. At this setting the Cricut machine goes around all the shapes twice, so it takes a bit longer, but then the leaves come out totally clean without any tears, which I prefer. There is nothing worse than having to punch out cutouts that are stuck. Ok maybe there are a couple things worse, but not many.
When you approach the endpoint it becomes a little more cumbersome, but the wreath itself is pretty sturdy, so you can handle it without too much worry. For the very last row I cut the tabs on the leaves in half to make them fit as shown below, right. It went pretty smoothly.
Then I hung up the wreath and looked to see if I had any sparse spots and then glued in 5-6 leaves here and there until I liked the look.
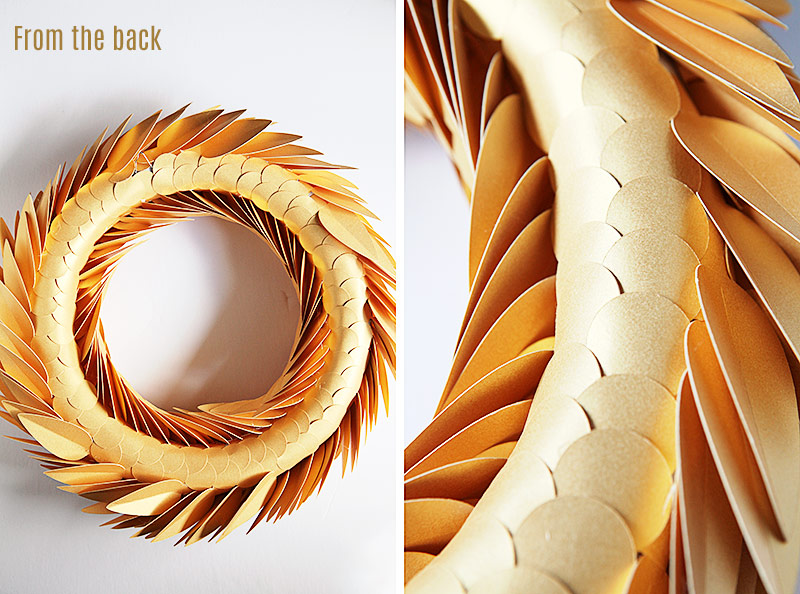
I want to hang this from my mirror above my fireplace, but you can see the back of the wreath in the mirror, so I am contemplating what to do there... I think I will cut some gold circles and put on the back to cover it all up. I will update the post with a picture here when I do that.
Update: I made 1.25 inch circles and added to the back so the wreath looks nice when hung on a mirror. I fit 35 circles onto an 8.5 x 11 sheet of paper and I cut out 3 sheets and ended up with just a few circles to spare.
Download here for free - for personal use.
This is a free download for personal use. You may not sell this download or offer it on your site without my prior written permission.
Here is the tutorial for how to handle score lines in SVGs.
If you have any suggestions for SVG projects you would like me to make in the future, please let me know in the comments.
Please pin this

Some blog posts contain affiliate links to products I use. More information
This article: Gold leaf wreath DIY - with free downloadable template and cut file first appeared on http://ahomeforcrafts.com.
Share

I am a Danish American decorating life in Seattle. I love all things design and I am especially passionate about color, scale and texture.
I can’t think of anything more fun than coming up with a new project, making it, photographing it and sharing it with you on my websites.
AHomeForCeramics.com AHomeForDesign.com AHomeForFood.com AHomeForCrafts.com My Portfolio